Hosting a website is a relatively easy task, although it seems a bit complex. To help our readers, we will teach you to step by step how to host a website on the internet.
With the pandemic, many companies and liberal professionals saw on the internet the opportunity to continue growing during the crisis, but the lack of knowledge in the area makes many people give up on having an internet business.
Even though it is not a complicated task, for a lay user to host a website on the internet can be almost impossible, mainly because it is difficult to find quality materials that teach step-by-step how to do it.
We know that these days, the solution to expanding a personal business can be on the Internet. In this respect, many people don’t know where to start. Faced with such challenges, in this tutorial, we’ll explain everything you need to know about how to host a website and thus ensure your presence on the internet.
What is Hosting?
Hosting is the fundamental part of the functioning of your website or virtual store. We can define hosting as the backbone of your webpage. In other words, hosting acts as a virtual environment, keeping your website accessible to the public. In this aspect, it is the hosting services that keep your website online, allowing users to access your blog.
In the concept of website hosting, purchasing a hosting plan consists of renting a virtual space maintained by physical servers, operated 24 hours a day, 7 days a week, without interruptions, and with all the infrastructure prepared to keep the website online in case of failures.
When we hire a website hosting service, we are actually paying for the rental of a physical server (or parts of it). It is on the server that your page data is kept, which includes images, videos, pages, plugins, among many other things.
Thus, a web server is responsible for all functions related to data processing and storage, in addition to keeping all your page files on high-performance disks. With that, we can say that a hosting server works similarly to a building, where the various apartments can be rented by different people. In this case, these apartments can be public, and each person can access them through an address, called a domain.
How to Host a Website?
In this process, you also need to define a domain so that people can access your site. Rest assured, this is the least labor-intensive part, many hosting plans have free domains for a year, and domain registration is usually done in the plan’s contracting process. In addition, there is also unlimited hosting, which offers several advantages and unlimited features.
With all the infrastructure ready for your website, that is, the place where it will work, we need to create it. An accommodation only delivers an empty house, now, you need to assemble your things inside it. The first step then is the creation of the website, that is, the pages and files that people will access to browse your website. If you already have it all ready, even better, you’ll just need to publish it.
Step 1: Register Website Domain
Register a domain to be used as your website address. The domain is the name of your website and is responsible for allowing people to access your website easily.
The domain will have a format, it can also end with “.net”, “.com” or some of the hundreds of extensions available, but the main and most recommended ones are “.com”, “.com”, “.net” or “.org”.
The chosen extension influences the registry value, so be aware that some extensions can have very high registry and renewal values. And don’t forget that the best hosting offers a year of the free domain.
When the hosting company that the customer is purchasing the domain with the plan they leave all the configurations ready to use the domain in the contracted hosting service.
Now, those who are going to register a domain in a company other than where they are going to hire the hosting service or who are going to use a domain they previously purchased, need to take some additional steps to make the appointment of the domain to the hired hosting service.
This domain notation is responsible for saying that the website is hosted by a different company from where the domain was registered, that is, it indicates the “path” that the user will go through when typing the website address in the browser.
Step 2: Hire Website Hosting
Hire a website hosting service, which will be responsible for storing all your application files and data. Another option is to use services such as Wix, which does not require hiring a hosting service but offers limited resources compared to hosting the site directly on a hosting site. And if you’re still confused about which hosting to choose, Get Your Website Today is where you can analyze them.
At this moment, some doubts will arise about what is the best hosting for a website, but rest assured, we will help you choose the best service. By following the tips below you will be able to hire a quality hosting service and choose the right plan for your needs.
Which Hosting Plan Should I Choose?
In general, there are many companies that provide a lot of hosting plans. At that point, a hosting company is fully responsible for keeping the services running. They have a robust and interconnected infrastructure, containing thousands of distributed servers.
Hosting companies offer different types of plans, which may vary depending on your consumption profile. This is a great advantage as the user can choose the most affordable plans if that is the case. Therefore, you just have to choose which plan best fits your daily usage profile.
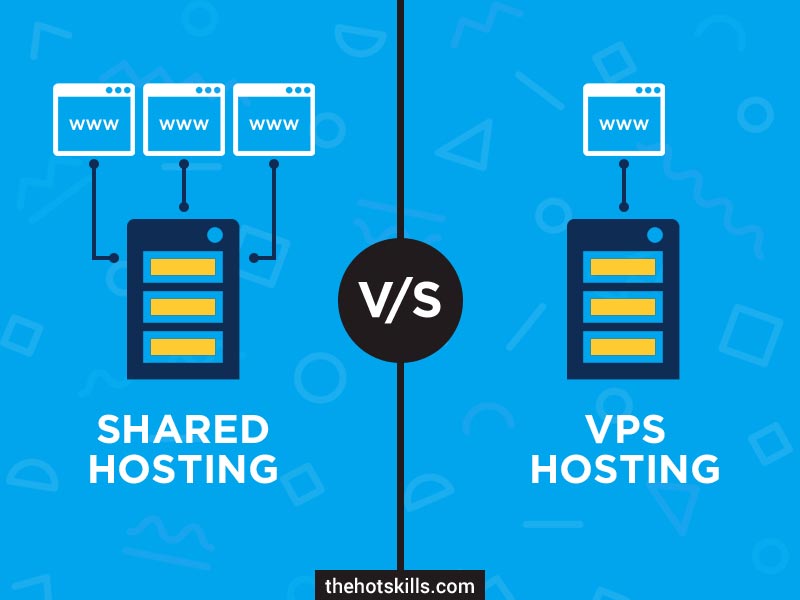
Shared Hosting
In shared hosting, customers share a common infrastructure, in this case, the same hosting server. Therefore, a shared hosting plan can be very nice for some users who are looking for more cost-effectiveness, as, most of the time, the price is really quite affordable.
For this same reason, shared hosting can be a very attractive option for users looking for something simpler, meaning they just need a very simple server to run some applications and perhaps a personal webpage and email services. If you need a more robust solution, maybe you can go for something bigger, like a VPS hosting plan or dedicated hosting.
Cloud Hosting
Cloud hosting is similar to dedicated hosting, but with much more advanced features. Thus, Cloud hosting uses a much more flexible infrastructure, composed of thousands of servers interconnected in the same physical environment, called data centers.
Cloud hosting is for those looking for a flexible and reliable environment to run applications. It differs a lot from other types of hosting, especially in terms of payment and collection model. While traditional hosting models offer monthly plans, where the plans are fixed, in Cloud hosting, some companies offer services with paid resources according to your personal use, increasing or decreasing according to the computing resources consumed.
Therefore, on days with higher demand, ie, peak days, the cost will be higher. Even so, this is an advantage, as you only pay for what you used. This can be an option for users who require a little more computational processing, being ideal for running applications in the cloud and hosting websites with high demand per day.
Hosting by VPS
In a VPS hosting, the customer rents the famous virtual machines, which are slices of resources provided by the same physical server. VPS hosting benefits from the concept of virtualization, which allows you to run multiple applications or divide resources into chunks, creating a virtual environment for each customer. Thus, the same server can have several virtual instances, which function as independent machines, containing its own operating system and applications.
In a VPS hosting plan, a physical server is shared among other clients, but they are virtualized, which means that there is no interference between one virtual instance and another. In this scenario, a virtual space is actual as a machine with its own resources, as if there are machines inside other machines. This is an efficient solution, as computing resources are not wasted.
On the VPS server, there are virtual spaces, each containing an individual resource, such as a virtual processor (vCPU), a RAM space, and a disk slice (SSD or HDD)
In VPS hosting plans, customers have greater flexibility, as they can manage their own virtual resources granted to them, without worrying about others. Depending on your use and need, VPS plans are much more affordable than contracting dedicated hosting or cloud plans, which can cost much more.
Dedicated Hosting
Dedicated hosting is aimed at the most demanding users, who need a unique and specific server to run heavier applications or more sophisticated websites. This is a solution for those looking for high performance as dedicated machines are not shared with other users.
Certainly, a dedicated server fulfills its role, which guarantees flexibility and agility in performing complex tasks. However, one of the biggest disadvantages is the price, a dedicated server can cost a lot.
In general, dedicated hosting prices can vary, they depend on the features offered (such as number of processors, number of dedicated IPS, RAM memory, disk space, among other things). Most hosting services offer fixed plans, others offer customized plans (where the customer can choose the machine components separately).
Therefore, if you are a user who will not run such heavy applications, a great option is VPS hosting, much more suitable in this case (medium size applications).
Step 3: Create the Website and Publish it
After hiring the hosting service, it is time to create the website. This step offers several options, depending of course on the service and hosting plan of the contracted websites.
For this, there is the option to install WordPress, choose a theme, configure your website, and WordPress plugins, but there is also the option to use the company’s website creator (if you choose shared hosting, the most common and best suited).
How Can I Create and Publish My Website?
This question can be answered in several ways. Either way, you can hire a third-party company or a web designer to carry out your project. These professionals can help you both in maintaining your site and in modeling your entire page template. Although it seems the simplest, this is still the most expensive, as the final cost will depend a lot on what you want, so keep this in mind.
There are other alternatives too, many hosting companies provide website creators, where you can edit the layout of the pages yourself via a control panel. In this case, it is not necessary to have in-depth technical knowledge, as everything is done through a graphical interface, it’s like dragging, copying, and pasting, you just do this process, while the entire tool takes care of building the codes.
Many users end up joining WordPress, a content manager (CMS) that allows you to create websites, without the need to know programming for it. Besides, it’s a 100% practical platform, providing all the tools you need to manage and model your new website. Many hosting companies rely on WordPress, otherwise, you can also install the platform manually, without any problems or additional costs for this.
Step 4: Publishing the Website on a Website Hosting
Of all, this is the easiest task. Perhaps what takes the most time is the creation of the website. Even using a tool for this, it is necessary to define how the menus will be, how each page can be accessed, what is the chosen background, among other things. Remember that these website creation tools are not always free, for the most part, you will need to join a plan to maintain the service.
Companies that provide website hosting services often bundle a website creator into their own plans without additional charges for doing so. In this regard, it is important to check this before making any decision, as it may be that you already have something like this installed on your hosting. Otherwise, site creator plans are usually pretty user-friendly, billed monthly or annually.
Once that’s done, the final step is publishing your website. For website creators, this is very easy and practical, just click a button and your website will be published and working perfectly. In general, that’s just it, website creators create all the code and submit the files to the disk directories of your hosting server. In addition, many of the website creation tools already submit content as edits are made, ensuring you don’t miss a thing during the process. Pretty cool, don’t you think?
Publishing a website directly on your hosting with cPanel
If you already have all the codes and files ready, but still don’t know how to publish them, don’t despair, this process is much easier than you really think. In all website hosting services, you can manage everything yourself through the control panel, modifying and managing your website settings at any time, without having to hire someone for it.
In general, most hosts use cPanel, a simple control panel with many features for administering your site, backup, domain redirection, among other things. In this aspect, to publish content, that is, the HTML codes of your website, you can use the file manager offered by your hosting. For this tutorial, we use the cPanel manager, which is very similar to others on the market.
With that, to upload your site directly through cPanel, access the File Manager option. Then a window will open for you to select the location where the files should be published.
In this same window, look for the folder ” public_html ” or “ www ” (the name varies according to the hosting company), the folder where your site should be in order to be published correctly and accessed through your domain. Once this is done, with the directory open, click on Load to select the files on your computer. Okay, now just save and your site is now available for use. So, log in to your domain and make sure everything is as planned.
Publishing a website via FTP/SFTP clients
The FTP (File Transfer Protocol) is a basic protocol for sending and receiving files, especially among hosting servers. Hosting services also use SFTP/FTP to upload files referring to your website. In this aspect, to send such files, it is necessary to install an application to establish this connection, we suggest here FileZilla, one of the most used in this task.
For security reasons, always use the SFTP connection. This way it is possible to prevent the FTP password and data from leaking on the internet. Check with your hosting company to verify the correct way to make the SFTP connection.
To set up a connection in FileZilla, go to the New Site button and enter your site name. Fill in all requested information correctly, otherwise, the connection will not be established. To help you with that, we’ve listed below how you should fill in the configuration fields:
- Host: ftp.your_domain.com (put your domain with the prefix “ ftp”.);
- Port: 21 (port referring to the FTP protocol);
- Server Type: FTP – File Transfer Protocol;
- User: administrator (insert your FTP username here);
- Password: mypass1 (enter your FTP password here).
After everything is set up, click on the OK button and click on the connection icon to communicate with your website via FTP. Once this is done, all the folders stored on your hosting disk will appear. To publish your files and your page, simply drag the files into the ” public_html ” folder or right-click and select Submit. Okay, everything is ready and you can access your domain.
Conclusion
In this article, we present all the step-by-step instructions you need to follow to host a website and publish your website. The process may seem complex, but in reality, it is quite simple as you can see. So don’t forget anything, choose the alternative that best fits what you intend to do. We hope that all this has helped you to host, create, and promote your website on the web.